Proper washing techniques are essential for maintaining 100 cotton items, ensuring they remain soft and durable, with
specific guidelines
available for optimal care and washing methods always.
General Guidelines for Washing 100 Cotton
Washing 100 cotton items requires attention to detail to maintain their quality and appearance. The general guidelines for washing 100 cotton include using cold water, mild detergent, and avoiding machine washing whenever possible. According to experts, hand washing is the best method for washing 100 cotton, as it allows for gentle care and prevents shrinkage. Machine washing can also be used, but it is essential to use the delicate cycle and cold water to prevent damage. Additionally, it is recommended to avoid using hot water, as it can cause shrinkage and affect the texture of the cotton. By following these general guidelines, individuals can ensure their 100 cotton items remain soft, durable, and looking their best. Proper washing techniques can also help extend the lifespan of 100 cotton items, making them a worthwhile investment for anyone looking for high-quality clothing and textiles.
Hand Washing 100 Cotton
Hand washing 100 cotton in cold water with mild detergent is recommended for optimal care and washing methods always using gentle techniques and soft materials.
Importance of Cold Water and Mild Detergent
The use of cold water and mild detergent is crucial when washing 100 cotton items, as it helps preserve the fabric’s quality and texture. Cold water prevents shrinkage and color fading, while mild detergent gently cleans the fabric without damaging it. Using hot water or harsh detergents can cause the cotton to shrink, lose its shape, or become rough. Mild detergent is specifically designed for washing delicate fabrics like cotton, and it is usually free of harsh chemicals and bleach. By using cold water and mild detergent, you can ensure that your 100 cotton items remain soft, comfortable, and long-lasting. This is especially important for items that are worn regularly, such as clothing and bedding. Following these simple guidelines can make a big difference in the longevity and appearance of your 100 cotton items, and help you enjoy them for a longer period. Regular washing with cold water and mild detergent will keep your cotton items looking their best.
Machine Washing 100 Cotton
Machine washing 100 cotton requires a delicate cycle with cold water and a mild detergent for optimal care always using specific settings.
Delicate Cycle and Cold Water Usage
Using a delicate cycle and cold water when washing 100 cotton is crucial to prevent shrinkage and damage to the fabric. The cold water helps to preserve the texture and color of the cotton, while the delicate cycle reduces the risk of snagging or tearing. It is also important to use a mild detergent that is specifically designed for washing delicate items. This will help to clean the cotton without damaging it. Additionally, it is recommended to avoid using hot water or harsh detergents, as these can cause the cotton to shrink or lose its shape. By following these guidelines, you can help to ensure that your 100 cotton items remain soft, durable, and looking their best. Regular washing in cold water and a delicate cycle will also help to prevent the buildup of dirt and debris, keeping your cotton items fresh and clean.
Caring for 100 Organic Cotton
Proper care for 100 organic cotton involves gentle washing and drying methods always using
specific
techniques.
Pre-Shrinking and Laundry Cycles
Higher-quality cotton that has been pre-shrunk will withstand hundreds of laundry cycles with far more aplomb. Premium cotton isn’t always easy to find, but when you’re shopping from reputable sources, it’s a sure thing. The method of pre-shrinking is quite rare, and it involves washing the cotton fabrics at a lower temperature to prevent shrinkage. This process helps to ensure that the cotton retains its shape and size even after multiple washes. By pre-shrinking the cotton, manufacturers can guarantee that their products will remain durable and long-lasting. Furthermore, pre-shrinking also helps to reduce the risk of shrinkage during the laundry cycle, making it easier to care for 100 cotton items. With proper pre-shrinking and laundry techniques, 100 cotton items can withstand repeated washing and drying without losing their quality or shape, making them a great investment for anyone looking for durable and long-lasting clothing. Overall, pre-shrinking is an essential step in the manufacturing process of 100 cotton items.
Protecting Cotton from Shrinking and Bobbling
Specialized washing detergent helps protect cotton from losing shape and bobbling, ensuring softness and durability always with proper care and washing techniques applied correctly every time.
Specialized Washing Detergent for Cotton Protection
Using a specialized washing detergent is crucial for protecting 100 cotton items from shrinking and bobbling. This type of detergent is designed to gently clean and care for cotton fabrics, preserving their softness and durability. The detergent works by reducing friction between cotton fibers, preventing pilling and snagging. It also helps to maintain the natural texture and appearance of the cotton, ensuring it remains breathable and comfortable to wear. By using a specialized washing detergent, individuals can enjoy their 100 cotton items for a longer period, without worrying about shrinkage or damage. The detergent is also gentle on colors, preventing fading and discoloration, and is suitable for use in both hand and machine washing. Overall, using a specialized washing detergent is an essential step in caring for 100 cotton items and ensuring they remain in good condition. Regular use of this detergent can help to extend the lifespan of cotton items.
The RapiTest Soil Test Kit is designed for simplicity and provides accurate results․ It includes instructions for testing pH and nutrient levels․ Complete with color comparators and test capsules, it guides users to adjust soil pH and nutrition․
In gardening, soil composition is crucial for plant health and yields․ The RapiTest Soil Test Kit offers a user-friendly approach to understanding your soil’s pH, nitrogen (N), phosphorus (P), and potash (K) levels․ This kit simplifies the process, making it accessible for home gardeners to assess nutrient deficiencies and pH imbalances․ By following the instructions, you can quickly determine if your soil lacks essential nutrients or needs pH adjustments․
Soil testing with RapiTest helps avoid guesswork in fertilization and soil amendment․ It provides insights into what your plants need to thrive, whether it’s adjusting the acidity or alkalinity or supplementing with specific nutrients․ The kit includes guidelines for making necessary corrections, ensuring your plants receive the right balance for optimal growth․ By using the RapiTest kit, you can create a healthier garden environment․
Understanding the RapiTest Soil Test Kit Components
The RapiTest kit includes test capsules for pH, N, P, and K, along with color comparators․ It also contains an eye dropper for solution transfer and complete instructions for use and interpretation․
Test Capsules and Color Comparators
The heart of the RapiTest Soil Test Kit lies in its patented color comparator system and specialized test capsules․ The kit provides 40 test capsules, with 10 each dedicated to measuring acidity/alkalinity (pH), nitrogen (N), phosphorus (P), and potash (K) levels in the soil․ These capsules contain reagents that react with the soil solution, producing a color change that corresponds to the concentration of each element․
The color comparators are crucial for interpreting the test results․ Each comparator features a color gradient that represents different levels of pH or nutrient concentration․ By comparing the color of the solution in the test chamber with the color comparator, users can determine the approximate levels of pH, nitrogen, phosphorus, and potash in their soil․ The kit instructions provide detailed guidance on matching the solution color to the comparator to ensure accurate readings․ This system allows for a simple and visual assessment of soil composition․
Eye Dropper and Solution Transfer
The RapiTest Soil Test Kit includes an eye dropper specifically designed for precise solution transfer during the testing process․ This seemingly simple tool plays a vital role in ensuring accurate and consistent results․ After mixing the soil sample with water and allowing it to settle, the eye dropper is used to carefully extract the clear solution from the mixture, avoiding any sediment that could interfere with the color development․
The controlled transfer of this solution into the testing chambers is crucial, as the correct amount of solution is needed to react properly with the test capsules․ The eye dropper allows users to dispense the liquid precisely, minimizing the risk of overfilling or underfilling the chambers․ This precision is essential for achieving reliable color comparisons and accurate determination of pH, nitrogen, phosphorus, and potash levels in the soil sample․ The included instructions clearly demonstrate its correct utilization․
Step-by-Step Instructions for Using the RapiTest Kit
Using the RapiTest kit involves collecting soil samples, performing individual tests for pH, nitrogen, phosphorus, and potash, and comparing the resulting colors to interpret nutrient levels․ Refer to included guide․
Collecting Soil Samples
Begin by gathering soil samples from various spots in your garden or yard, ensuring a representative sample․ Avoid mixing samples from different areas initially․ Use a clean trowel or spoon to collect soil from about 2-3 inches below the surface․ Break up the soil and allow it to dry naturally; while not essential, it eases handling․
For accuracy, test several samples individually rather than mixing them․ Place each sample in a clean container․ When testing, follow the kit’s instructions precisely․ This ensures reliable results for pH, nitrogen, phosphorus, and potash levels․ Proper soil sampling sets the foundation for effective testing and informed gardening decisions, leading to healthier plant growth․ Remember to clean your tools between samples to prevent contamination․
By diligently following these steps, you’ll obtain accurate soil readings to guide your gardening efforts․
Performing the pH Test
To perform the pH test using the RapiTest Soil Test Kit, begin by placing a small amount of your prepared soil sample into the designated chamber of the testing unit․ Add distilled water to the soil until it reaches the indicated fill line, ensuring the soil is adequately moistened;
Next, open one of the pH test capsules—identifiable by its color—and carefully empty its contents into the chamber containing the soil and water mixture․ Gently stir the mixture with a clean tool to dissolve the capsule’s contents thoroughly․ Allow the mixture to settle for a few minutes, permitting the color to develop fully․ Compare the resulting color of the solution against the pH color comparator chart provided in the kit․
Match the solution’s color as closely as possible to a color on the chart to determine your soil’s pH level․ Record the pH reading for later analysis and adjustments․
Performing the Nitrogen (N) Test
To conduct the Nitrogen (N) test with your RapiTest kit, start by placing a soil sample into the appropriate compartment․ Add distilled water until the required level is reached, ensuring the soil is properly saturated․
Next, open a nitrogen test capsule and pour its contents into the soil-water mixture․ Stir the solution gently but thoroughly to ensure the capsule’s contents dissolve completely․ Allow the mixture to sit for approximately ten minutes to allow the color to fully develop․
After the waiting period, compare the color of the solution against the nitrogen color chart provided in your kit․ Find the closest match to determine the nitrogen level in your soil․ Record the nitrogen level, noting whether it is depleted, adequate, or surplus, to guide subsequent fertilization decisions․
Performing the Phosphorus (P) Test
To perform the Phosphorus (P) test using the RapiTest Soil Test Kit, begin by filling the appropriate compartment on the testing tray with your prepared soil sample․ Add distilled water to the compartment until it reaches the designated fill line, ensuring that the soil is fully saturated with water;
Carefully open a phosphorus test capsule and empty its contents into the soil and water mixture․ Use a clean stirring rod or utensil to thoroughly mix the solution, ensuring that the powder from the capsule is fully dissolved and evenly distributed․ Allow the mixture to sit undisturbed for about ten minutes․
After the ten-minute waiting period, compare the color of the solution to the phosphorus color chart included in the kit․ Match the color as closely as possible to determine the phosphorus level in your soil sample․ Note your findings for future adjustments․
Performing the Potash (K) Test
To conduct the Potash (K) test with your RapiTest Soil Test Kit, start by placing a small amount of your prepared soil sample into the designated compartment on the test tray․ Ensure the soil is finely broken up and free from any large clumps or debris, which could affect the accuracy of the results․
Next, add distilled water to the soil-filled compartment until the water level reaches the indicated mark․ Mix the soil and water thoroughly, ensuring that the soil is fully saturated․ Carefully open a potash test capsule and pour the powder into the soil and water mixture․ Stir the solution well to fully dissolve the powder․
Allow the solution to settle for approximately ten minutes, then compare the color of the liquid to the potash color chart provided with the kit․ Determine the potash level in your soil by matching the solution color to the closest corresponding color on the chart․
Interpreting the RapiTest Results
Interpreting your RapiTest results involves comparing the solution colors to the provided charts․ These charts indicate pH, nitrogen, phosphorus, and potash levels, helping you understand your soil’s composition and nutrient availability․
Understanding pH Levels
Understanding pH levels is critical because it affects nutrient availability for plants․ The RapiTest kit helps determine soil pH, typically ranging from 0 to 14, with 7 being neutral․ Values below 7 indicate acidity, while those above 7 indicate alkalinity․ Most plants thrive in slightly acidic conditions, around 6․0 to 7․0․
The pH level influences the solubility of nutrients, making them more or less accessible to plant roots․ For instance, excessively acidic soil can hinder phosphorus uptake, while alkaline soil can limit the availability of iron and other micronutrients․ The RapiTest kit provides a quick way to assess pH and take corrective measures if needed․ Refer to the included plant pH preference list to determine optimal levels for specific plants and adjust accordingly to promote healthy growth․ Remember to always follow the instructions provided․
Understanding Nutrient Levels (N, P, K)
Understanding nutrient levels, specifically Nitrogen (N), Phosphorus (P), and Potassium (K), is vital for plant health․ Nitrogen supports leaf growth, Phosphorus aids root and flower development, and Potassium contributes to overall plant vigor․ The RapiTest kit measures these levels in your soil․ Deficiencies can lead to stunted growth, discoloration, or poor yields․
The kit uses color-coded capsules and a comparator to estimate nutrient concentrations․ Compare the resulting solution color to the chart to determine if levels are low, adequate, or high․ Low levels indicate a need for fertilization with appropriate NPK ratios․ Remember that the RapiTest provides an estimate․ Always refer to the instructions included with the kit for accurate interpretation․ Addressing nutrient imbalances promotes healthier, more productive plants in your garden or lawn․
Adjusting Soil Based on Test Results
After interpreting your RapiTest results, adjust your soil as needed․ The kit includes instructions for correcting pH and fertilization guidelines․ Addressing deficiencies ensures optimal plant growth and health․
Adjusting Soil pH
If your RapiTest indicates a pH level that differs significantly from your plants’ needs, adjustments are necessary․ The included instructions provide guidance for modifying soil pH․ You can correct pH at any time during the growing season, but it is preferable to do so before planting․ For more acidic soil (lower pH), adding lime will increase the pH․ Conversely, adding sulfur or organic matter will lower the pH for alkaline soils․ Always follow the product-specific instructions and retest your soil after making adjustments to ensure you are within the optimal range; Remember to consider the specific pH preferences of your plants, as different species thrive in varying pH levels․ Regularly monitoring and adjusting soil pH is key for maintaining a healthy and productive garden․ The RapiTest kit simplifies this process, making it accessible for both novice and experienced gardeners․
Fertilization Guidelines Based on Deficiencies
After using the RapiTest kit, identify any nutrient deficiencies – Nitrogen (N), Phosphorus (P), or Potash (K)․ The kit’s instructions offer fertilization guidelines based on these results․ If nitrogen is depleted, use a nitrogen-rich fertilizer․ For phosphorus deficiencies, choose a fertilizer high in phosphorus to promote root development․ If potash levels are low, use a fertilizer with a higher potash content․ When selecting a fertilizer, consider whether you prefer organic or synthetic options․ Always follow the fertilizer’s instructions carefully to avoid over-fertilization, which can harm your plants․ Retest your soil periodically after fertilization to ensure nutrient levels are balanced․ Remember, healthy soil is the foundation for healthy plants, and addressing deficiencies promptly will lead to better growth and yields․ The RapiTest kit empowers you to make informed decisions about fertilization, promoting optimal plant health․
Plant pH Preference List and Guide
The RapiTest Soil Test Kit includes a comprehensive plant pH preference list, essential for successful gardening․ This guide lists over 450 plants, detailing their ideal soil pH range․ Understanding these preferences is crucial because pH affects nutrient availability; Plants thrive when grown in soil matching their preferred pH․ The guide helps you select plants suitable for your soil’s natural pH or adjust the pH accordingly․ For instance, blueberries prefer acidic soil, while many vegetables prefer slightly acidic to neutral soil․ Using this list, you can ensure plants receive optimal conditions․ The RapiTest instructions explain how to adjust pH if necessary․ Regularly consulting this guide helps prevent nutrient deficiencies and promotes vigorous plant growth․ By aligning plant selection with soil pH, gardeners increase their chances of a bountiful harvest and a thriving garden․ This list simplifies gardening, making it more successful․
JBL Charge 3 Instruction Manual: A Comprehensive Guide
Welcome to your ultimate guide for the JBL Charge 3! This manual provides detailed instructions and essential information to help you maximize your experience with this powerful portable Bluetooth speaker‚ ensuring seamless setup and optimal performance for years of enjoyment․
Initial Setup and Powering On
Before diving into the immersive sound of your JBL Charge 3‚ let’s walk through the initial setup and powering on process․ Unboxing your speaker‚ you’ll find the JBL Charge 3‚ a micro-USB charging cable‚ and the user manual․ Ensure all components are present․ Visually inspect the speaker for any physical damage before proceeding․
To power on your JBL Charge 3‚ locate the power button‚ typically marked with a universal power symbol‚ usually found on the control panel․ Press and hold this button for approximately two to three seconds․ You should see the LED indicator light up‚ signaling that the speaker is now powered on․ A brief audible tone might also play to confirm the power-on status․
If the speaker doesn’t power on‚ it may require charging․ Connect the included micro-USB cable to the charging port on the speaker and the other end to a USB power adapter or a computer․ Allow the speaker to charge for at least 30 minutes before attempting to power it on again․ Once powered on‚ your JBL Charge 3 is ready for pairing and enjoying your favorite tunes․
Bluetooth Pairing and Connectivity
Establishing a Bluetooth connection with your JBL Charge 3 is a breeze․ Once the speaker is powered on‚ it will automatically enter pairing mode‚ indicated by a blinking Bluetooth icon․ If it doesn’t enter pairing mode automatically‚ press the Bluetooth button on the speaker until the icon starts flashing․
Now‚ on your smartphone‚ tablet‚ or other Bluetooth-enabled device‚ navigate to the Bluetooth settings menu․ Ensure that Bluetooth is enabled․ Your device will begin scanning for nearby Bluetooth devices․ From the list of available devices‚ locate and select “JBL Charge 3․”
If prompted‚ enter the pairing code “0000” (four zeros)․ In most cases‚ the pairing will occur automatically without requiring a code․ Once successfully paired‚ the Bluetooth icon on the speaker will become solid‚ indicating a stable connection․ You’ll also hear a confirmation tone from the speaker․
If you encounter any issues during pairing‚ ensure that the speaker is within close proximity to your device (ideally within 10 meters)․ Also‚ make sure no other Bluetooth devices are interfering with the connection․ You can now enjoy wireless audio streaming from your paired device․
Understanding the Control Buttons
The JBL Charge 3 boasts a user-friendly interface with clearly marked control buttons․ The Power Button‚ easily identifiable by its universal power symbol‚ turns the speaker on and off․ Press and hold it briefly to activate or deactivate the device․
The Bluetooth Button‚ marked with the Bluetooth logo‚ initiates the Bluetooth pairing mode․ Pressing it allows you to connect new devices or re-establish connections with previously paired devices․ A flashing light indicates pairing mode is active․
The Volume Buttons‚ represented by “+” and “-” symbols‚ control the speaker’s volume․ Press “+” to increase the volume and “-” to decrease it․ A tone will sound when the maximum or minimum volume is reached․
The Play/Pause Button‚ usually a single button with play and pause symbols‚ manages audio playback․ A single press pauses or resumes playback․ In some cases‚ double-pressing this button skips to the next track‚ while triple-pressing goes back to the previous track‚ depending on the device connected․
The JBL Connect Button‚ allows you to connect multiple JBL Connect-compatible speakers together for a amplified listening experience․
Volume Control and Playback
Mastering volume control and playback functions is key to enjoying your JBL Charge 3․ The volume can be adjusted directly on the speaker using the “+” and “-” buttons․ Pressing “+” increases the volume gradually‚ while pressing “-” decreases it․
You can also control the volume from your connected device‚ such as a smartphone or tablet․ Syncing the volume between your device and the speaker ensures a more consistent listening experience;
For playback control‚ the central button usually handles play‚ pause‚ and track skipping․ A single press pauses or resumes the music․ A double press typically skips to the next track‚ while a triple press returns to the previous track․ This functionality might vary slightly depending on the connected device and app being used․
When adjusting the volume‚ be mindful of the speaker’s maximum output․ Listening at excessively high volumes for extended periods can damage your hearing․ Always start at a lower volume and gradually increase it to a comfortable level․
Furthermore‚ ensure that your audio source is of good quality to maximize the listening experience․ Low-quality audio files can sound distorted‚ especially at higher volumes․
Water Resistance (IPX7 Rating)
The JBL Charge 3 boasts an IPX7 rating‚ indicating significant water resistance․ This means it can withstand immersion in water up to 1 meter (approximately 3․3 feet) for up to 30 minutes․ This rating makes it ideal for poolside use‚ beach trips‚ and even accidental splashes․
However‚ it’s crucial to understand the limitations․ While the Charge 3 can handle temporary immersion‚ it is not designed for prolonged underwater use․ Avoid submerging it for extended periods or in deeper water than specified․
Before exposing the speaker to water‚ ensure that all ports‚ including the charging port‚ are tightly sealed․ Failure to do so can allow water to enter the device‚ potentially causing damage․ If the speaker does get wet‚ dry it thoroughly with a soft‚ lint-free cloth before use․
Saltwater and chlorinated water can be more corrosive than fresh water․ Therefore‚ rinse the speaker with fresh water after exposure to saltwater or chlorinated water to prevent damage․ The IPX7 rating only applies to freshwater․
Remember‚ the IPX7 rating is a test conducted under controlled conditions․ Normal wear and tear can reduce the effectiveness of the water resistance over time․
Charging the JBL Charge 3
To charge your JBL Charge 3‚ locate the Micro-USB charging port on the back of the speaker‚ usually protected by a rubber flap․ Ensure the flap is fully closed when not charging to maintain water resistance․
Use the provided USB cable or any standard Micro-USB cable to connect the speaker to a USB power source․ This can be a computer‚ a USB wall adapter (like the one for your phone)‚ or a portable power bank․
When charging‚ the LED indicator lights will illuminate․ The number of illuminated lights indicates the current battery level․ All five lights lit indicate a full charge․ During charging‚ the lights will blink sequentially to show the charging progress․
A full charge typically takes around 4․5 hours using a 5V/2․3A adapter․ Charging time may vary depending on the power output of the USB source․ Using a lower amperage adapter will result in a slower charging time․
Avoid using the speaker while it’s charging for extended periods‚ as this can potentially affect the battery’s lifespan․ Once fully charged‚ disconnect the speaker from the power source․
If the speaker is not charging‚ ensure the cable is securely connected to both the speaker and the power source․ Try using a different USB cable or power adapter to rule out any faulty equipment․
Battery Life and Indicators
The JBL Charge 3 boasts an impressive battery life‚ offering up to 20 hours of playtime on a single full charge․ However‚ the actual battery life may vary depending on the volume level and the type of audio content being played․
To check the battery level‚ simply look at the five LED indicator lights located on the front of the speaker․ When the speaker is powered on‚ these lights will illuminate briefly to indicate the remaining battery capacity․
Each illuminated light represents approximately 20% of the battery charge․ If all five lights are lit‚ the speaker is fully charged․ If only one light is lit‚ the battery is nearing depletion and requires charging․
While the speaker is charging‚ the LED lights will blink sequentially to indicate the charging progress․ Once fully charged‚ all five lights will remain illuminated without blinking․
A low battery warning will be indicated by a flashing red light and an audible tone․ When you hear this warning‚ it’s time to connect the speaker to a power source for charging․
To maximize battery life‚ avoid exposing the speaker to extreme temperatures and store it in a cool‚ dry place when not in use․ Regularly charging the speaker fully can also help maintain battery health․
Using JBL Connect
The JBL Charge 3 features JBL Connect‚ a technology that allows you to wirelessly connect multiple JBL speakers together to amplify your listening experience․ You can connect two JBL speakers for stereo sound or link multiple speakers to create a party mode․
To use JBL Connect‚ ensure that all the JBL speakers you want to connect are compatible with the feature․ Power on all the speakers․
On the first speaker‚ press the JBL Connect button․ It’s usually located on the top or back of the speaker and is identified by an infinity symbol-like icon․
Next‚ on the other speakers you want to connect‚ press the JBL Connect button as well․ The speakers will automatically search for and connect to each other․
Once connected‚ you’ll hear a confirmation tone from all the speakers․ You can then choose to play music in stereo mode‚ where one speaker plays the left channel and the other plays the right channel‚ or in party mode‚ where all speakers play the same audio․
To switch between stereo and party mode‚ press the JBL Connect button on any of the connected speakers․ To disconnect the speakers‚ simply press the JBL Connect button on any of the speakers again․
Troubleshooting Common Issues
Even with a reliable device like the JBL Charge 3‚ you might encounter occasional issues․ Here’s a guide to troubleshoot some common problems:
Issue: Speaker won’t turn on․
Solution: Ensure the speaker is charged․ Connect it to a power source using the provided USB cable and let it charge for at least 30 minutes․ If it still doesn’t turn on‚ try a different power adapter or cable․
Issue: Bluetooth pairing problems․
Solution: Make sure the speaker is in pairing mode (the Bluetooth indicator should be flashing)․ On your device‚ turn Bluetooth off and then on again․ If the JBL Charge 3 doesn’t appear in the list of available devices‚ try resetting the speaker․
Issue: No sound or distorted audio․
Solution: Check the volume level on both the speaker and your connected device․ Ensure that the audio source is playing correctly․ If the sound is distorted‚ try reducing the volume․
Issue: Speaker won’t charge․
Solution: Verify that the USB cable and power adapter are working correctly․ Try a different outlet or USB port․ If the issue persists‚ the battery or charging circuitry may be faulty․
Resetting the JBL Charge 3
Performing a reset on your JBL Charge 3 can resolve various issues‚ such as connectivity problems‚ unresponsiveness‚ or unusual behavior․ A reset returns the speaker to its factory default settings‚ clearing any saved pairings or configurations․ Here’s how to reset your JBL Charge 3:
Steps:
Power On: Ensure that your JBL Charge 3 is powered on․
Press and Hold: Simultaneously press and hold the “Volume +” button and the “Play/Pause” button․
Hold for Several Seconds: Continue holding both buttons for approximately 5-10 seconds․
Observe the Indicator: Watch for the speaker to power off or indicate a reset by flashing its indicator lights․
Power On Again: After the speaker resets‚ power it back on․ It should now be in its default state‚ ready for pairing․
If you continue to experience issues after resetting your speaker‚ consult the troubleshooting section or contact JBL customer support for further assistance․
Care and Maintenance
Proper care and maintenance will extend the lifespan and maintain the performance of your JBL Charge 3․ Here are some guidelines to follow:
Cleaning:
Exterior: Use a soft‚ damp cloth to gently wipe the exterior surfaces․ Avoid using harsh chemicals‚ solvents‚ or abrasive cleaners․
Grille: For the speaker grille‚ use a soft brush or a vacuum cleaner with a brush attachment to remove dust and debris․
Storage:
Temperature: Store the JBL Charge 3 in a cool‚ dry place away from extreme temperatures and direct sunlight․
Humidity: Avoid storing the speaker in humid environments‚ as moisture can damage the internal components․
Protection: When not in use‚ store the speaker in a protective case or bag to prevent scratches and damage․
Usage:
Water Exposure: While the JBL Charge 3 has an IPX7 rating‚ avoid prolonged submersion in water or exposure to saltwater․
Impact: Protect the speaker from drops and impacts‚ as these can damage the internal components․
Charging: Use the provided charging cable and adapter to avoid damaging the battery․
By following these care and maintenance tips‚ you can ensure that your JBL Charge 3 remains in optimal condition for years to come․
Technical Specifications
Understanding the technical specifications of your JBL Charge 3 is essential for optimal use and troubleshooting․ Here’s a detailed overview:
Music Play Time: Up to 20 hours (varies by volume level and audio content)
USB Charge Out: 5V / 2A (maximum)
Bluetooth Transmitter Power: 0-9dBm
Bluetooth Transmitter Frequency Range: 2․402 – 2․480GHz
Bluetooth Transmitter Modulation: GFSK‚ π/4 DQPSK‚ 8DPSK
Dimensions (H x W x D): 213 x 87 x 88․5mm
Weight: 800g
Water Resistance: IPX7 (protected against immersion in water up to 1 meter for 30 minutes)
These specifications provide a comprehensive understanding of the JBL Charge 3’s capabilities and limitations‚ ensuring you get the most out of your device․
Safety Precautions
To ensure your safety and prolong the lifespan of your JBL Charge 3‚ please adhere to these essential safety precautions:
Water Exposure: While the Charge 3 is IPX7 water-resistant‚ avoid prolonged submersion․ Ensure the charging port is completely dry before charging․
Charging: Use only the specified charger (5V/2․3A)․ Using a higher voltage charger may damage the battery and void the warranty․
Temperature: Avoid exposing the speaker to extreme temperatures (below 0°C or above 45°C)․ Store in a cool‚ dry place․
Handling: Do not drop‚ crush‚ or puncture the speaker․ Avoid placing heavy objects on it․
Cleaning: Clean with a soft‚ dry cloth․ Do not use solvents‚ chemicals‚ or detergents․
Repairs: Do not attempt to repair the speaker yourself․ Contact authorized JBL service centers for any repairs․
Battery: Do not dispose of the speaker in fire or heat․ Dispose of used batteries properly according to local regulations․
Listening: Avoid listening at high volumes for extended periods to prevent hearing damage․
Children: Keep the speaker out of reach of young children to prevent accidental ingestion of small parts․
By following these precautions‚ you can enjoy your JBL Charge 3 safely and effectively for years to come․
Farberware Air Fryer Instructions: A Comprehensive Guide
Welcome! This guide offers comprehensive Farberware air fryer instructions, ensuring easy use and delicious results. Whether you’re a new owner or a seasoned pro, learn to maximize your appliance. We will cover safe operation to maintenance tips.
Understanding Your Farberware Air Fryer Model
Before diving into the delightful world of air frying, familiarizing yourself with your specific Farberware air fryer model is crucial. Farberware offers a range of air fryers, from compact, manual versions to larger, digital models with advanced features. Knowing your model’s capabilities ensures optimal cooking performance and safety.
Start by identifying the model number, usually found on a sticker at the bottom or back of the appliance. Once identified, consult the user manual for specific details about its functions and features. For instance, some models have preset cooking programs for common foods like fries, chicken, or fish.
Understanding the control panel is essential; Manual models typically have simple dials for temperature and time, while digital versions offer precise adjustments and display readouts. Some models may also include additional features like a preheat function, keep-warm setting, or a shake reminder. Knowing these functionalities will help you take full advantage of your Farberware air fryer.
Initial Setup and Preparation
Before your first air frying adventure, proper initial setup and preparation are vital. Begin by carefully unboxing your Farberware air fryer, ensuring all parts are present and undamaged. Refer to the user manual to identify each component, such as the frying basket, crisper tray, or any included accessories.
Next, thoroughly clean the removable parts with warm, soapy water. Avoid abrasive cleaners that could damage the non-stick coating. Wipe down the exterior of the air fryer with a damp cloth. Ensure all components are completely dry before reassembling.
Choose a suitable location for your air fryer, ensuring it’s on a stable, heat-resistant surface with adequate ventilation. Keep it away from flammable materials and other heat sources. Before plugging it in, verify that the voltage matches your local electrical supply.
Finally, perform a test run by preheating the air fryer for a few minutes. This helps eliminate any residual manufacturing odors. Now, you’re ready to start cooking!
Operating the Air Fryer: Basic Functions
Mastering the basic functions of your Farberware air fryer is key to successful cooking. Start by familiarizing yourself with the control panel. Most models feature a digital display or manual dials for setting time and temperature. Consult your user manual for specific instructions for your model.
To begin, place your food in the frying basket, ensuring it’s not overcrowded. Overcrowding can prevent proper air circulation and result in uneven cooking. Slide the basket into the air fryer.
Set the desired cooking time and temperature according to your recipe or food packaging instructions. Use the timer dial or digital controls to adjust the time, and the temperature dial to set the heat.
Press the start button to begin the cooking cycle. Some models may require you to manually turn on the power. During operation, the air fryer will circulate hot air around the food, cooking it to a crispy perfection. Many air fryers have an auto-shutoff feature.
Temperature and Time Settings for Common Foods
Achieving perfectly cooked food in your Farberware air fryer depends on setting the correct temperature and time. While specific settings vary by model and recipe, here are general guidelines for common foods.
For frozen french fries, try 400°F (200°C) for 12-15 minutes, shaking the basket halfway through. Chicken wings generally require 375°F (190°C) for 20-25 minutes, flipping them for even browning.
Vegetables like broccoli or Brussels sprouts benefit from 350°F (175°C) for 10-12 minutes, tossed with a little oil and seasonings. For steak, aim for 400°F (200°C) for 8-10 minutes, depending on thickness and desired doneness.
Remember to preheat your air fryer for optimal results. Always consult your recipe or a reliable cooking chart for precise instructions. Adjust cooking times based on the size and quantity of food. Regularly check your food to prevent overcooking.
Using Accessories: Racks, Baskets, and Pans
Farberware air fryers often come with various accessories that enhance their versatility. Understanding how to use racks, baskets, and pans is crucial for optimal cooking results.
Racks are ideal for multi-layer cooking, allowing you to cook different foods simultaneously. They also improve air circulation around items like chicken or steak, ensuring even crisping. Baskets are perfect for foods that need shaking or tossing, such as french fries or vegetables, promoting uniform cooking.
Pans, especially those that are air fryer-safe, are great for baking or cooking foods with sauces. Ensure pans fit properly within the air fryer basket or chamber.
When using accessories, always follow the manufacturer’s instructions. Avoid overcrowding the air fryer, as this can hinder airflow and result in unevenly cooked food. Clean accessories thoroughly after each use to maintain hygiene and prevent buildup. Experiment with different accessories to discover new cooking possibilities.
Cleaning and Maintenance Tips
Proper cleaning and maintenance are essential for prolonging the life of your Farberware air fryer and ensuring safe food preparation. Always unplug the air fryer and allow it to cool completely before cleaning.
The basket and any removable parts can typically be washed in warm, soapy water or placed in the dishwasher if they are dishwasher-safe. Avoid using abrasive cleaners or scouring pads, as these can damage the non-stick coating.
For the interior and exterior of the air fryer, wipe them down with a damp cloth. Stubborn food residue can be removed with a paste of baking soda and water. Ensure all parts are completely dry before reassembling the air fryer.
Regularly check the heating element for any buildup and gently clean it with a soft brush if necessary. Store the air fryer in a dry place to prevent rust or corrosion. Following these simple maintenance tips will keep your Farberware air fryer in top condition.
Troubleshooting Common Issues
Even with proper use, you might encounter some common issues with your Farberware air fryer. One frequent problem is food not cooking evenly. This often happens when the basket is overloaded. Ensure food is arranged in a single layer to allow proper air circulation.
Another issue could be food not getting crispy. This can be due to insufficient oil or moisture. Lightly toss food with oil before cooking or pat it dry to remove excess moisture. If the air fryer isn’t turning on, check the power cord and outlet.
Make sure the basket is properly inserted, as some models have a safety feature that prevents operation if it’s not. Smoke coming from the air fryer usually indicates excessive grease or food particles. Clean the air fryer thoroughly after each use to prevent this.
If these steps don’t resolve the issue, consult your user manual or contact Farberware customer support for further assistance. Addressing these common issues will ensure your Farberware air fryer continues to perform well.
Safety Precautions and Guidelines
Ensuring safety while using your Farberware air fryer is paramount. Always place the air fryer on a stable, heat-resistant surface away from flammable materials. Never immerse the air fryer unit in water or any other liquid, as this can cause electric shock.
Keep the air fryer away from children and pets during operation. The exterior surfaces can get hot, so use oven mitts or heat-resistant gloves when handling the basket or accessories. Avoid touching hot surfaces directly to prevent burns.
Do not operate the air fryer if the cord or plug is damaged. Always unplug the appliance when not in use and before cleaning. Be cautious when using accessories, ensuring they are compatible with your Farberware model.
Never block the air vents on the back or sides of the air fryer, as this can cause overheating. Follow the recommended cooking times and temperatures to prevent food from burning. By adhering to these safety precautions, you can enjoy worry-free cooking with your Farberware air fryer.
Recipes and Cooking Ideas for Your Farberware Air Fryer
Unleash your culinary creativity with your Farberware air fryer! The possibilities are endless, from crispy appetizers to delicious main courses and even desserts. For a quick and healthy snack, try air-frying vegetables like broccoli, Brussels sprouts, or sweet potato fries. Toss them with olive oil, salt, and pepper for a simple yet flavorful dish.
For main courses, consider air-frying chicken wings, salmon fillets, or even a whole roasted chicken. The air fryer cooks food evenly and quickly, resulting in crispy skin and juicy interiors. You can also experiment with different marinades and seasonings to create unique flavor combinations.
Don’t forget about desserts! Air-fried donuts, cookies, and even mini cakes are easy to make and incredibly satisfying. Use pre-made dough or batter for a quick treat, or try a homemade recipe for a more elaborate dessert. With a little imagination, your Farberware air fryer can become your go-to appliance for all your cooking needs.
Finding User Manuals and Support Resources
Accessing the user manual for your Farberware air fryer is crucial for safe and effective operation. Start by checking the original packaging or any included documentation. If you cannot locate the physical manual, visit the Farberware website. Look for a “Support” or “Customer Service” section where you can search for manuals by model number.
Many online retailers, such as Amazon or Walmart, also host user manuals in the product description or customer review sections. Additionally, third-party websites dedicated to appliance manuals can be valuable resources. Ensure the manual you find matches your specific air fryer model to avoid incorrect information.
For additional support, consider contacting Farberware‘s customer service directly. They can provide troubleshooting assistance, answer specific questions, and guide you to relevant resources. Online forums and communities dedicated to air fryer enthusiasts can also offer helpful tips and solutions to common issues. Utilizing these resources ensures you get the most out of your Farberware air fryer.
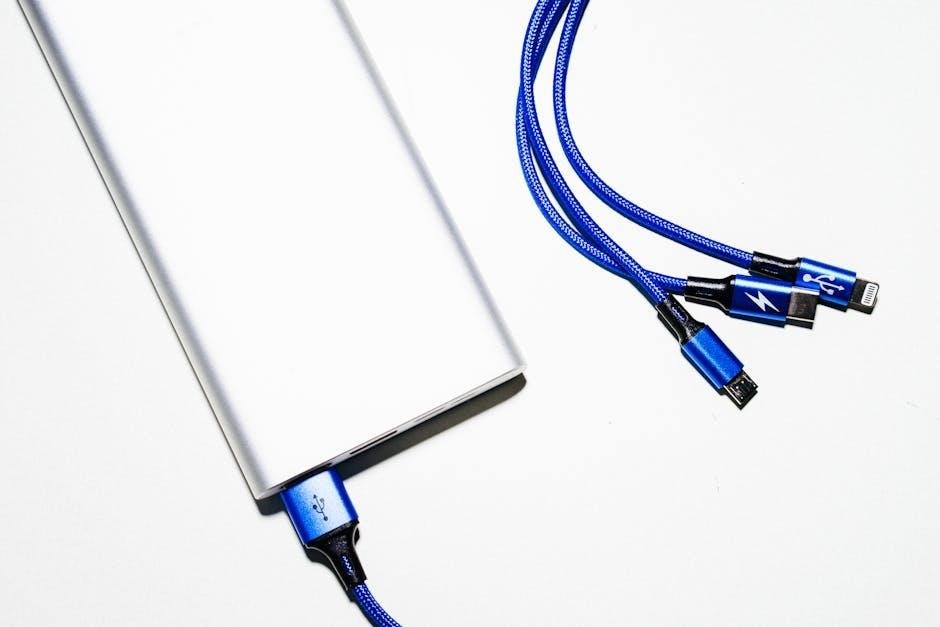
This section provides a comprehensive guide to properly utilizing your connected 510 battery․
From initial setup and charging to connecting cartridges and understanding settings‚ these instructions will ensure an optimal vaping experience․ Follow these steps for safe and efficient use․
Understanding 510 Thread Batteries
A 510 thread battery is the industry standard for powering vape cartridges‚ offering versatility
across various concentrates and oils․ The “510” refers to the threading size‚ making it
compatible with a wide range of cartridges․ These batteries typically utilize lithium-ion
technology‚ providing a balance of power and portability․ Familiarizing yourself with the
components and functionality of your 510 battery is crucial for a safe and enjoyable vaping
experience․ These batteries are commonly found in vape pens due to their simplicity‚ ease of
use‚ and relatively compact design․
Understanding the voltage settings and pre-heat functions is paramount for tailoring your vape
to your preferred experience․ Some batteries have a button while others are buttonless․
It is important to follow manufacturer instructions․ Always use the charger that came with the
battery․ A green icon means it is good to vape․
These batteries are convenient‚ portable‚ and easy to charge․
Identifying Battery Components
To effectively use your 510 thread battery‚ it’s essential to identify its key components․
The most prominent is the 510 threaded connection‚ where cartridges are attached․ The power
button‚ if present‚ controls activation and often allows voltage adjustments․ LED indicators
display battery life and settings․ The charging port‚ typically a micro-USB or USB-C‚ facilitates
recharging․ Some batteries feature variable voltage dials or buttons for customized vapor
production․
Many advanced models now include an OLED display screen‚ providing real-time information on
settings and puff count․ Understanding these components empowers you to optimize performance and
troubleshoot potential issues․ The battery casing protects the internal electronics․ The CartCover
adds protection․
By understanding the battery’s components‚ users can properly operate and maintain their devices․
When the bars turn red your battery needs to be recharged․ Some batteries require cartridges
with bottom or base airflow holes for proper usage․
Some batteries have a button while others are buttonless․
It is important to follow manufacturer instructions․ Always use the charger that came with the
battery․
Charging the 510 Battery
Properly charging your 510 battery is crucial for optimal performance and longevity․ First‚
identify the charging port‚ usually a micro-USB or USB-C; Connect the provided charging cable
to the port and plug it into a USB power source‚ such as a computer or wall adapter․ The LED
indicator will typically illuminate‚ often changing color (e․g․‚ red to green) once fully charged․
Avoid using high-voltage chargers‚ as they can damage the battery․
It is important to fully charge your battery with the charger that came with it․ Most 510
thread batteries have a light that shows when they are charged up (usually it changes from red to
green)․ The battery life indicator is displayed on the LED smart screen․ A green battery
icon means it is good to vape․
Do not put the battery at any environment over 45oC or inside water․ Always follow the
manufacturer’s instructions to get the most out of the battery․ Power off first‚ before
taking out the battery of the machine․
Monitor the charging process and disconnect the battery once fully charged to prevent
overcharging‚ which can reduce battery life․
Turning the Battery On/Off
Most 510 thread batteries utilize a simple five-click mechanism to turn on and off․ To activate
the battery‚ rapidly press the power button five times in quick succession․ The LED indicator
light will typically blink to confirm that the device has been turned on․ Repeat this process
to turn the battery off; the LED will again blink to acknowledge the command․
This safety feature prevents accidental activation while stored in a pocket or bag‚ conserving
battery life and preventing unintended heating of the attached cartridge․ Some batteries may
feature a lock/unlock function‚ also activated by pressing the button five times rapidly and
simultaneously․
If the battery does not light up after clicking five times‚ wait 10 more minutes and try
again․ Ensure your battery is adequately charged․ To unlock your pen you simply click the
button 5 times rapidly consecutively till the led on the button blinks up․
Always ensure the device is fully off before storing or transporting it․ Familiarize yourself
with the specific on/off procedure outlined in your battery’s user manual for optimal operation․
Attaching a 510 Cartridge
Connecting a 510 thread cartridge to your battery is a straightforward process․ First‚ ensure
that both the battery and the cartridge threads are clean and free of any debris․ Carefully
align the threads of the cartridge with the threads on the battery․ Gently screw the cartridge
onto the battery in a clockwise direction․
Avoid over-tightening‚ as this can damage the threads or the connection․ Screw the 510 thread
cartridge that is 12 MM in diameter or less all the way into the top of the vape battery․ The
cartridge should be snug but not forced․
Some devices utilize a magnetic adapter․ In these cases‚ screw the magnetic connector onto your
cartridge‚ then insert the cartridge into the slot of the device․
Once the cartridge is securely attached‚ test the connection by taking a small puff․ If the battery activates and vapor is produced‚ the connection is successful․ If not‚ double-check
the connection and ensure that the battery is powered on․
Most batteries are compatible with most vape carts‚ and sizes up to 3ml‚ but it requires
cartridges with bottom or base airflow holes for proper use․
Variable Voltage Settings
Many 510 thread batteries offer variable voltage settings‚ allowing users to customize their
vaping experience․ Adjusting the voltage affects the heat applied to the cartridge‚ influencing
vapor production‚ flavor intensity‚ and overall smoothness․ To change the voltage settings on
a O․pen vape battery‚ consult the user manual for specific instructions‚ as methods vary
between devices․
Typically‚ voltage is adjusted by pressing the power button a specific number of times‚ often
three times in quick succession․ The device may indicate the current voltage setting through
LED lights or a display screen․ Lower voltage settings generally produce more flavorful vapor
with less intensity‚ while higher settings create larger clouds but can sometimes sacrifice
flavor․
Experiment with different voltage levels to find your preferred balance․ Start with a low setting
and gradually increase the voltage until you achieve the desired vapor production and flavor․
Pay attention to the manufacturer’s recommendations for your specific cartridge‚ as some are
better suited to certain voltage ranges․
The Honeystick Interactive 510Battery Manual also provides the instructions․
Pre-Heat Function Instructions
Many 510 thread batteries come equipped with a pre-heat function‚ designed to warm up
thick oils within the cartridge before use․ This feature is particularly useful in colder
environments or when the cartridge hasn’t been used for a while‚ as it helps to prevent
clogging and ensures a smoother‚ more consistent vapor production․
To activate the pre-heat function‚ typically you press the power button a specific number of
times‚ often twice in rapid succession․ The battery will then begin a short heating cycle‚
usually lasting between 10 and 15 seconds․ During this time‚ the device may display a
different colored light or vibrate to indicate that the pre-heat function is active․
Once the pre-heat cycle is complete‚ the battery will either automatically return to its
standard operating mode or require you to press the power button again to initiate vaping․
Refer to your battery’s user manual for precise instructions on how to activate and
deactivate the pre-heat function‚ as the method can vary between different models․ The
Honeystick Interactive 510Battery Manual provides specific instructions for their
devices․ Using this function correctly can significantly improve your vaping experience‚
especially with thicker oils․
Changing Colors: Means pre-heat mode is engaged․ Push button to exit mode at anytime․
Usage Guide and Essential Tips
To maximize your vaping experience with a 510 thread battery‚ consider these usage tips․
First‚ always fully charge the battery before initial use․ This ensures optimal performance
and prolongs battery life․ When attaching a cartridge‚ avoid overtightening‚ as this can
damage the threads or the cartridge itself․
When vaping‚ start with short puffs to gauge the vapor production and adjust accordingly․
Holding the button for too long can overheat the cartridge‚ potentially leading to a burnt
taste․ If your battery has variable voltage settings‚ experiment to find the temperature
that best suits your preference and the type of oil you’re using․
For button-operated batteries‚ remember to turn the battery off when not in use to prevent
accidental activation․ Most batteries can be locked or unlocked by clicking the button five
times rapidly․ Also‚ be mindful of the cartridge size; the Honeystick Interactive 510 Battery‚ for instance‚ is compatible with cartridges up to 3ml․
Finally‚ keep your battery and cartridges clean․ Regularly wipe down the battery and the
cartridge connection points with a dry cloth to remove any residue․
By following these tips‚ you’ll not only enhance your vaping experience but also extend the
lifespan of your 510 thread battery and cartridges․
Maintenance and Storage
Proper maintenance and storage are crucial for prolonging the life of your 510 thread battery; Regularly clean the battery contacts and the 510 thread connection with a
cotton swab dipped in isopropyl alcohol․ This removes residue buildup‚ ensuring a solid
connection․
Avoid exposing your battery to extreme temperatures or humidity‚ as this can damage the
internal components․ Store the battery in a cool‚ dry place away from direct sunlight․
When not in use for extended periods‚ it’s best to store the battery partially charged‚
around 40-60%․
Before storing‚ ensure the battery is turned off to prevent accidental activation․ Some
batteries have a locking feature activated by pressing the button five times rapidly; utilize
this function․ Periodically check the battery for any signs of damage‚ such as cracks or
swelling‚ and discontinue use if any are observed․
For cleaning cartridges‚ refer to the manufacturer’s instructions‚ but generally‚ a gentle wipe
with a soft cloth is sufficient․ Never submerge cartridges in liquid․
By adhering to these maintenance and storage guidelines‚ you’ll ensure your 510 thread battery remains in optimal condition‚ providing consistent and reliable performance for
years to come․
California corporations use Form 100 to file their franchise or income tax with the state. The California Franchise Tax Board provides the form and a comprehensive instruction booklet on its website. This booklet includes essential schedules and related forms needed for accurate filing.
Overview of Form 100
Form 100, officially known as the California Corporation Franchise or Income Tax Return, is a crucial document for corporations operating in California. It serves as the primary tool for calculating and reporting the franchise or income tax owed to the state. The form requires corporations to detail their income, deductions, and credits, which are then used to determine the tax liability. Comprehensive instructions are available from the California Franchise Tax Board (FTB) to aid in accurate completion. These instructions cover various aspects, including eligibility, specific line-item explanations, and common errors to avoid. Proper completion and timely submission of Form 100 are essential for compliance with California tax laws.
Purpose of Form 100
Form 100 enables California corporations to calculate and remit their franchise or income tax. It facilitates reporting income, deductions, and credits. Accurate filing ensures compliance with California tax regulations, and the form is vital for proper tax assessment.
Filing Requirements
California corporations must file Form 100 to report and pay their franchise or income taxes. The form requires detailed financial information, including income statements, balance sheets, and deductions. Corporations must accurately complete each section, ensuring all figures align with their financial records.
Compliance involves submitting the completed form by the due date. Extensions may be available, but they require prior application. Corporations should review the instructions carefully to avoid errors, which can lead to penalties. Maintaining thorough documentation is crucial for supporting the information provided on Form 100.
Electronic filing options are available and often encouraged for faster processing. Taxpayers should verify their entity ID, like their California Corporation Number, when filing.
Who Must File Form 100
All corporations doing business in California, including banks, financial corporations, RICs, REITs, FASITs, and corporate general partners of partnerships, must file Form 100. This requirement ensures compliance with California’s franchise tax regulations.
Minimum Franchise Tax
All corporations subject to California’s franchise tax are required to pay at least the minimum franchise tax. This includes banks, financial corporations, RICs, REITs, FASITs, corporate general partners of partnerships, and corporate members of LLCs doing business in California. Regardless of income, these entities must fulfill this minimum obligation.
Form 100 is used to calculate and remit this tax, ensuring that all covered entities contribute to the state’s revenue. Failing to pay the minimum franchise tax can lead to penalties and legal issues, underscoring the importance of compliance for all California corporations.
Key Sections of Form 100 and Schedules
Form 100 includes crucial schedules like Schedule H for dividend income deduction and Schedule P for alternative minimum tax and credit limitations. These sections help corporations accurately report and calculate their tax obligations.
Schedule H (100): Dividend Income Deduction
Schedule H (100) on California Form 100 allows corporations to claim a deduction for dividend income received from other corporations. Understanding the specific rules and limitations for this deduction is essential for accurate tax calculation. The schedule requires corporations to provide details about the dividends received, including the payer’s name and the amount.
Careful completion of Schedule H can result in significant tax savings for eligible corporations. Ensure all requirements are met and that supporting documentation is readily available. Misreporting dividend income can lead to penalties. Review the form instructions thoroughly before completing Schedule H.
Schedule P (100): Alternative Minimum Tax and Credit Limitations
Schedule P (100) of California Form 100 addresses the Alternative Minimum Tax (AMT) and credit limitations for corporations. AMT is calculated to ensure that corporations pay a minimum amount of tax, even if they have deductions and credits. This schedule helps determine if a corporation is subject to AMT and calculates the amount due.
Additionally, Schedule P outlines limitations on the use of certain tax credits. Corporations must carefully complete this schedule to accurately calculate their tax liability. Understanding the interaction between AMT and credit limitations is crucial for proper tax planning and compliance, potentially affecting their tax strategy.
Filing Deadlines and Extensions
California corporations must adhere to specific filing deadlines for Form 100. Corporations can file for an extension using FTB 3539 if they cannot meet the original deadline, ensuring timely compliance and avoiding penalties.
Automatic Extension (FTB 3539)
Corporations unable to file Form 100 by the original due date can utilize Form FTB 3539 to request an automatic extension. This form allows corporations additional time to prepare and submit their California franchise or income tax return. Filing FTB 3539 provides an extension of time, typically up to seven months, to file the return.
However, it’s crucial to understand that this extension applies only to filing the return, not to paying the tax owed. The tax liability must still be paid by the original due date to avoid penalties and interest. Form FTB 3539 should be submitted on or before the original due date of the return.
Accessing Form 100 and Instructions
Form 100 and its instructions are readily available on the California Franchise Tax Board (FTB) website. You can download the form and instructions for the relevant tax year directly from the FTB’s website.
California Franchise Tax Board Website
The California Franchise Tax Board (FTB) website serves as the primary source for accessing Form 100 and related instructions. Corporations can download the current year’s form, previous year’s forms, and comprehensive instruction booklets from the FTB website. These resources are essential for accurately completing and filing the California Corporation Franchise or Income Tax Return.
The FTB website provides various other resources, including publications, FAQs, and online services, to assist corporations in understanding and complying with California tax laws. It’s recommended to regularly check the FTB website for updates and announcements regarding Form 100 and other tax-related matters. The website also offers secure online portals for electronic filing and payments.
Common Errors and How to Avoid Them
Filing Form 100 accurately is crucial to avoid penalties and delays. Common errors include incorrect Entity ID, miscalculated income, and failure to attach required schedules. To prevent these mistakes, carefully review the form instructions and ensure all sections are filled out completely and accurately. Double-check all calculations and reconcile figures with supporting documentation.
Pay close attention to specific requirements for deductions and credits. Verify that the information entered matches the supporting documentation. It is also important to submit the completed form by the due date. Review the form for any mistakes before submission.
S Corporation Filing (Form 100S)
S corporations in California must file Form 100S to report their income or franchise tax. This form is used to calculate the tax owed, considering factors like income and deductions specific to S corporations.
Tax Rate for S Corporations
California S corporations are subject to a specific tax rate, which differs from the standard corporate tax rate. Generally, S corporations must pay the greater of the minimum franchise tax or 1.5% of their income. However, financial S corporations face a higher tax rate of 3.5%.
It’s crucial to accurately determine the applicable tax rate to ensure correct tax calculation and compliance. Form 100S instructions provide details on how to figure this out, including any specific conditions or exceptions that may apply. Reviewing these instructions carefully is essential for S corporations filing in California. This ensures adherence to state tax regulations.