Brother P-Touch label makers offer versatile solutions for organization, providing instant access to manuals, guides, and support for various models.
These devices empower users to create professional labels, stamps, and more, catering to diverse needs with user-friendly operation and extensive resources.
What is a Brother P-Touch Label Maker?
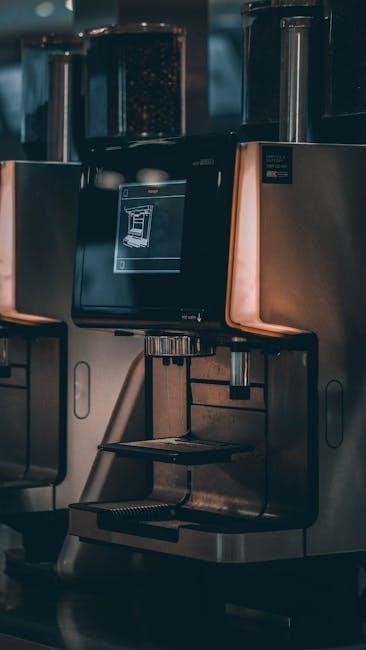
Brother P-Touch label makers are compact, portable devices designed for creating customized labels quickly and efficiently. Utilizing thermal transfer printing technology, these machines don’t require ink – instead, they use heat to transfer images onto specialized P-Touch tape.
They are incredibly versatile, suitable for home, office, or industrial applications, offering organization solutions for everything from file folders and storage containers to cables and assets. A key benefit is the availability of extensive online resources, including downloadable user manuals and troubleshooting guides, ensuring users can maximize their label maker’s potential.
Popular Brother P-Touch Models
Brother offers a diverse range of P-Touch label makers, catering to varying needs and budgets. The PT-12 and PT-15 are entry-level options, ideal for basic labeling tasks, while the PT-2030 provides enhanced functionality and a larger display.
For more demanding applications, the PT-2300/2310 models offer stamp functionality, and the PT-1750 provides a user-friendly experience. Newer models like the PT-E800 series and PT-P910BT incorporate Bluetooth and Wi-Fi connectivity for mobile printing. Accessing specific user manuals online is crucial for understanding each model’s unique features and operation.
Getting Started: Basic Operations
Before using your P-touch, familiarize yourself with initial setup, power options, and the keypad layout for efficient label creation and operation.
Powering On and Initial Setup
To begin, ensure your Brother P-touch label maker is properly powered. You can utilize either batteries or the optional AC adapter for operation. For battery use, carefully install the recommended battery type, observing correct polarity as indicated within the battery compartment.
Press the power button, typically located on the side or top of the device, to initiate startup. The display will illuminate, and the unit will perform a self-check. Follow any on-screen prompts for initial settings, such as language selection or date/time configuration.
Refer to your specific model’s user manual for detailed instructions, as procedures may vary slightly.
Installing Batteries or Power Adapter
For battery operation, locate the battery compartment, usually on the back or bottom of the Brother P-touch. Open the compartment cover and insert the required batteries (typically AAA or AA), matching the polarity (+ and -) markings inside. Ensure batteries are securely seated.
Alternatively, you can use the optional AC adapter. Plug the adapter into a standard electrical outlet and connect the other end to the DC-in jack on the label maker.
The adapter will typically override battery power when connected. Always consult your model’s manual for specific battery type and adapter specifications.
Understanding the Keypad and Display
The Brother P-touch keypad generally includes alphanumeric keys, function keys (like “Print,” “Clear,” “Shift”), and navigation buttons. Familiarize yourself with their layout. The display screen shows your typed text, selected font, and other settings;
Common display indicators include battery level, tape width settings, and editing mode. Use the navigation buttons to scroll through menus and options. The “Shift” key often accesses secondary functions printed on the keys.
Refer to your specific model’s manual for a detailed explanation of each key and display element.
Creating Your First Label
Begin by powering on your Brother P-Touch. Select your desired font, size, and label dimensions. Then, type your text and preview before printing!
Selecting a Font Style and Size
Brother P-Touch label makers offer a variety of font styles and sizes to customize your labels. Navigate through the font options using the keypad or selector buttons on your specific model.
Experiment with different fonts to achieve the desired look, ranging from standard to more decorative styles. Adjust the font size to ensure readability and fit within the label width.
Preview your label frequently to confirm the font and size are appropriate for your application. Consider the viewing distance when selecting a font size – larger fonts are ideal for labels viewed from afar.
Remember to save preferred font combinations for future use!
Choosing a Label Length and Width
Brother P-Touch label makers accommodate various label sizes, determined by the installed tape cassette. The width is pre-defined by the cassette, while length is adjustable.
Use the keypad or selector buttons to specify the desired label length. Preview the label to ensure the text fits within the chosen dimensions. Consider the application when selecting length – longer labels are suitable for detailed information.
Avoid setting excessively long lengths, as this wastes tape. Some models offer automatic length adjustment based on text size. Always double-check your settings before printing!
Typing and Editing Text
Brother P-Touch label makers allow text input via the keypad. Utilize the shift key for uppercase letters and symbols. Most models feature a preview screen to visualize the label before printing.
Editing functions include backspace for deleting characters and cursor movement for inserting text. Some models offer find and replace features for efficient modifications. Explore the editing menu for options like underlining or bolding.
Carefully review the text for errors before printing, as corrections require re-typing. Practice efficient typing to streamline label creation!
Advanced Labeling Features
Brother P-Touch label makers enhance labels with symbols, frames, dates, times, and barcodes. These features provide customization and professional-looking results.
Using Symbols and Frames
Brother P-Touch label makers offer a diverse library of symbols to visually enhance your labels, conveying information quickly and effectively. Access these symbols directly through the device’s keypad, allowing for easy integration into your text.
Furthermore, you can enclose your text within decorative frames, adding a professional touch and drawing attention to important labels. Experiment with different frame styles to match your labeling needs and aesthetic preferences.
These features elevate your organization beyond simple text, creating visually appealing and informative labels for various applications, from home organization to office filing systems.
Adding Dates and Times
Brother P-Touch label makers streamline organization by allowing you to automatically imprint labels with current dates and times; This feature is invaluable for labeling files, inventory, or items requiring tracking of creation or expiration dates.
Access the date and time function through the device’s menu, selecting your preferred format. The label maker will dynamically insert the current date and time during printing, ensuring accuracy and eliminating manual entry.
This capability enhances label functionality, providing a clear record of when the label was created, crucial for efficient management and record-keeping.
Creating Barcodes
Brother P-Touch label makers extend beyond simple text, offering the capability to create barcode labels for inventory management, asset tracking, and retail applications. This feature streamlines processes and enhances data accuracy.
Access the barcode function through the device’s menu, selecting the desired barcode type (e.g., Code 39, Code 128). Input the data to be encoded, and the label maker will generate the corresponding barcode graphic.
Ensure compatibility with your scanning system by choosing the correct barcode symbology. Properly created barcodes improve efficiency and reduce errors in data collection.
Tape Cassette Management
Brother P-Touch label makers utilize various tape cassettes; proper installation and troubleshooting are key for optimal performance and consistent, high-quality label creation.
Types of P-Touch Tapes
Brother P-Touch label makers are compatible with a diverse range of tape cassettes, designed for various applications and environments. Standard laminated tapes offer durability for everyday use, while specialized options cater to specific needs.
These include durable adhesive tapes for rough surfaces, extra-strong adhesive tapes for challenging materials, and flexible ID tapes for curved surfaces. Furthermore, Brother offers fabric tapes for ironing onto clothing, and high-visibility tapes for enhanced readability.
Color-coded tapes and clear tapes with black or white print are also available, allowing for organization and clear identification. Selecting the appropriate tape ensures optimal adhesion, legibility, and longevity of your labels.
Installing a New Tape Cassette
To install a new Brother P-Touch tape cassette, begin by opening the tape compartment on your label maker. Ensure the unit is powered off before proceeding. Gently insert the new tape cassette into the compartment, aligning the tape hubs with the corresponding spindles.
The cassette should click securely into place. Next, feed the tape leader – the exposed portion of the tape – under the print head and through the tape guides. Close the tape compartment securely.
Your P-Touch is now ready to create labels with the new tape cassette. Refer to your model’s user manual for specific instructions and diagrams.
Troubleshooting Tape Feed Issues
If your Brother P-Touch experiences tape feed problems, first ensure the tape cassette is correctly installed and securely clicked into place. Verify the tape leader is properly threaded under the print head and through the guides.
Clean the print head and tape path with a soft, dry cloth to remove any dust or debris. If jamming persists, open the tape compartment and gently remove any tangled tape.
Try a different tape cassette to rule out a cassette defect. Consult your user manual for specific troubleshooting steps related to your model.

Memory and File Management
Brother P-Touch label makers allow saving label templates and recalling previously created labels, streamlining repetitive tasks and maximizing efficiency for users.
Saving Label Templates
Brother P-Touch label makers offer a convenient feature to save frequently used label formats as templates, eliminating the need for repeated text entry and formatting. This functionality significantly boosts productivity, especially when creating multiple labels with consistent information.
Typically, after designing your label – selecting font, size, and text – you can access a ‘Save’ or ‘Memory’ function on the device. The manual will guide you through assigning a unique number or name to the template for easy retrieval. Saved templates reside in the label maker’s internal memory, ready for quick access whenever needed.
This is particularly useful for address labels, warning signs, or any label requiring identical layouts, ensuring consistency and saving valuable time.
Recalling Saved Labels
Brother P-Touch label makers allow effortless retrieval of previously saved label templates from their internal memory. Accessing these saved designs streamlines repetitive labeling tasks, saving time and ensuring consistency. Typically, a ‘Recall’ or ‘Memory’ function on the keypad initiates the process.
The device will present a list of saved templates, often identified by their assigned number or name. Selecting the desired template instantly loads its formatting and text back into the editor, ready for printing or further modification.
This feature is invaluable for frequently used labels, like shipping addresses or inventory tags, offering a quick and efficient labeling solution.
Deleting Unwanted Labels
Brother P-Touch label makers provide a straightforward method for removing unnecessary templates from the device’s memory, optimizing storage space. Usually, after accessing the ‘Memory’ or ‘Recall’ function, a ‘Delete’ option becomes available. Selecting this initiates the removal process.
The label maker will typically prompt confirmation before permanently deleting the chosen template, preventing accidental data loss. It’s crucial to review the displayed label information carefully before confirming deletion.
Regularly clearing out unused labels ensures efficient memory management, allowing for the storage of new and frequently used designs, maximizing the device’s functionality.
Specific Model Instructions: PT-12 & PT-15
Brother PT-12 & PT-15 models share operational similarities, detailed in their user manuals, offering unique features like color printing on the PT-15.
PT-12: Unique Features and Operation
The Brother PT-12 is a compact and reliable label maker, ideal for basic labeling tasks. Its straightforward design prioritizes ease of use, making it perfect for home or small office environments.
Operation involves installing batteries or utilizing an AC adapter, followed by powering on the device. The keypad allows for text input and formatting, while the display provides a preview of the label.
Users can select font styles and sizes, adjust label length, and create simple, clear labels. Refer to the downloadable user manual for detailed instructions on specific functions and troubleshooting tips. It’s a classic model known for its dependability.
PT-15: Color Printing Guide
The Brother PT-15 distinguishes itself with its ability to produce color-coded labels, enhancing organization and visual clarity. To initiate color printing, ensure a compatible color tape cassette is installed correctly.
Navigate the device’s menu using the keypad to select the desired color for your label text or background. The PT-15 offers a range of color options, allowing for customized labeling solutions.
Consult the user manual for specific instructions on color selection and tape compatibility. Proper tape installation and menu navigation are crucial for achieving optimal color printing results. Enjoy vibrant and informative labels!

Specific Model Instructions: PT-2030
The PT-2030 offers detailed functions, including file memory for saving templates and creating high-quality labels. Refer to the user manual for comprehensive guidance.
PT-2030: Detailed Function Overview
The Brother PT-2030 label maker boasts a comprehensive feature set designed for efficient and versatile labeling. This model allows users to create professional-looking labels with various font styles, sizes, and formatting options. It includes a built-in memory capable of storing numerous label templates for quick recall and reuse, streamlining repetitive labeling tasks.
Users can easily edit text directly on the device, adjusting length and width to suit specific needs. The PT-2030 supports a range of Brother TZe tape cassettes, offering diverse colors and materials; Precautions and basic procedures are clearly outlined in the user manual, ensuring optimal performance and longevity of the device.
PT-2030: Using the File Memory
The Brother PT-2030’s file memory is a powerful tool for saving and reusing frequently used label designs. Users can store multiple templates, eliminating the need to repeatedly enter the same information. To save a label, utilize the dedicated memory function after creating and editing the desired text and formatting.
Recalling saved labels is simple – navigate through the file memory using the keypad to select the desired template. This feature significantly enhances efficiency, particularly for tasks involving consistent labeling requirements. The user manual provides detailed instructions on managing and organizing files within the PT-2030’s memory.
Specific Model Instructions: PT-2300/2310 & PT-1750
PT-2300/2310 models offer stamp functionality, while the PT-1750 simplifies label creation. Both provide efficient labeling solutions for diverse organizational needs.
PT-2300/2310: Stamp Functionality
The Brother PT-2300 and PT-2310 label makers uniquely incorporate a stamp functionality, expanding their utility beyond traditional labeling. This feature allows users to create custom stamps directly from the device, ideal for dates, logos, or frequently used phrases.
To utilize this, select the stamp mode on the keypad, then design your stamp using the available fonts and symbols. The device then prints a durable, adhesive stamp image. This eliminates the need for separate stamp-making equipment, streamlining workflows and offering a convenient all-in-one solution for both labeling and stamping requirements.
PT-1750: Basic Label Creation Steps
Creating labels with the Brother PT-1750 is a straightforward process. Begin by powering on the device and selecting your desired font style and size using the keypad. Next, specify the label length and width to match your needs. Input your text, utilizing the editing functions to correct any errors.
Once satisfied, press the print button. The PT-1750 will then produce a neatly printed label. Remember to consult the user manual for detailed instructions on advanced features like symbol insertion and tape cutting. This simple process enables quick and efficient label creation for various applications.
Troubleshooting Common Issues
Common problems include power failures, print quality issues, and tape jams. Refer to the user manual for solutions and troubleshooting tips to resolve these quickly.
Label Maker Won’t Turn On
If your Brother P-Touch label maker fails to power on, begin by verifying the batteries. Ensure they are correctly installed with the proper polarity, and replace them with fresh ones if necessary.
Alternatively, if using a power adapter, confirm it’s securely connected to both the label maker and a functioning power outlet. Inspect the adapter cable for any visible damage.
If the issue persists, try resetting the device – consult your specific model’s manual for reset instructions. A complete power cycle, removing all power sources for a minute, can sometimes resolve the problem.
Print Quality Problems
Poor print quality on your Brother P-Touch label maker often stems from a dirty print head. Regularly clean the print head using a soft, dry cloth or a cotton swab lightly dampened with isopropyl alcohol.
Ensure you’re using compatible Brother tape cassettes; non-genuine tapes can significantly impact print clarity. Also, check the tape’s quality – older or improperly stored tapes may yield faded or uneven results.
Adjusting the print density settings within the label maker’s menu can also improve output. Refer to your model’s manual for specific instructions on accessing and modifying these settings.
Tape Jams and Errors
Tape jams are a common issue with Brother P-Touch label makers. First, power off the device and carefully remove the tape cassette. Inspect the tape path for any obstructions or tangled tape fragments. Ensure the tape is loaded correctly, following the diagram on the cassette holder.
If errors persist, try a different, known-good tape cassette to rule out a faulty tape. Clean the tape guides with a soft, dry cloth. Avoid forcing the tape; gentle manipulation is key. Consult your user manual for specific error codes and troubleshooting steps.
Maintenance and Care
Regular cleaning with a soft cloth ensures optimal performance. Store your P-Touch in a safe, dry place, and consider replacing the print head periodically.
Cleaning the Label Maker
Maintaining a clean P-Touch is crucial for consistent label quality and longevity. Begin by powering off the device and disconnecting the power source or removing the batteries. Use a soft, dry cloth to gently wipe down the exterior casing, removing any dust or debris.
For the print head, a slightly dampened cloth with isopropyl alcohol can carefully remove ink residue. Avoid excessive moisture, as it could damage the internal components. Ensure the print head is completely dry before resuming operation. Regularly cleaning prevents build-up, ensuring clear and crisp label printing.
Storing Your P-Touch Label Maker
Proper storage extends the life of your Brother P-Touch. Always remove the batteries when storing for extended periods to prevent corrosion and potential damage. Store the label maker in a cool, dry place, away from direct sunlight and extreme temperatures.
A protective case or bag can shield it from dust and physical impacts. Avoid storing near magnetic fields or sources of vibration. Keep the user manual readily accessible for future reference. Careful storage ensures your P-Touch remains in optimal working condition when you need it.
Replacing the Print Head
Print head replacement is sometimes necessary for optimal label quality. Consult your specific model’s manual for detailed instructions, as procedures vary. Generally, it involves opening a designated compartment and carefully removing the old print head.
Install the new print head, ensuring it’s properly seated and aligned. Avoid touching the thermal element to prevent damage. Regular inspection and timely replacement maintain print clarity. Brother provides replacement print heads for many models, ensuring continued functionality and high-quality labeling.
Resources and Support
Brother’s website provides downloadable manuals, troubleshooting tips, and compatible tape supplies for all P-touch models, ensuring comprehensive user support and assistance.
Downloading User Manuals Online
Accessing your Brother P-touch label maker’s user manual online is remarkably straightforward. Brother offers a comprehensive library of downloadable manuals directly on their support website. This resource covers a vast range of models, from classic designs to the newest PT-E800 series and Bluetooth-enabled options like the PT-P910BT.
Simply navigate to the Brother Support website and search for your specific model number. You’ll find original user guides, quick start guides, and detailed documentation available for immediate download in PDF format. These manuals provide step-by-step instructions, troubleshooting advice, and valuable insights into maximizing your label maker’s capabilities.
Brother Support Website
The official Brother Support website serves as a central hub for all your P-touch label maker needs. It’s a treasure trove of resources, offering everything from downloadable user manuals and software updates to troubleshooting tips and frequently asked questions.
You can easily find assistance tailored to your specific model, ensuring you receive accurate and relevant guidance. The website also provides access to parts information and compatibility lists for various tape cassettes. Brother’s commitment to customer support is evident in the wealth of information readily available online, empowering users to resolve issues and optimize their labeling experience.
Finding Compatible Tape Supplies
Ensuring tape compatibility is crucial for optimal P-touch label maker performance. Brother offers a wide array of tape cassettes in various widths, colors, and materials to suit diverse applications. The Brother Support website features comprehensive compatibility lists, allowing you to quickly identify the correct tape for your specific model.
Beyond official Brother tapes, third-party options exist, but verifying compatibility is essential to avoid damage or poor print quality. Always refer to your label maker’s manual or the Brother website for recommended tape specifications to guarantee reliable results.
Leave a Reply
You must be logged in to post a comment.